You do not buy on Red Mountain for four walls. You buy for that sweep of valley and the ski mountains lined up on the horizon. If you are planning a remodel or a ground‑up build here, the view is your north star. In this guide, you will learn how to position rooms, choose glass, and design terraces that keep you warm, private, and future‑proof while celebrating the panorama. Let’s dive in.
Why the view leads on Red Mountain
Red Mountain sits on a ridgeline just north of downtown Aspen. Homes perch above the valley, which means long sightlines to Aspen Mountain, Highlands, and Buttermilk. That topography is why architects place primary living spaces and terraces on the view side, then organize service areas and arrivals on the uphill side. Local precedent supports this: projects like Oppenheim’s La Muna use broad, operable panels to frame the valley, while contemporary homes often layer terraces along the slope to reveal vistas step by step (La Muna by Oppenheim Architecture and CCY Architects’ Red Mountain House coverage).
Siting and massing that serve the view
Elevate or step down the slope
You usually face two choices:
- Lift the main living level and cantilever toward the view. This captures a cinematic sweep but can feel visually detached from the immediate landscape.
- Step the house down the slope. This builds a closer tie to the site and creates a sequence of terraces and framed openings that reveal the view as you move.
Both work. What matters is a clear hierarchy. Make shared rooms and outdoor living face the panorama, then use framed side views or smaller openings at secondary spaces for balance.
Plan for privacy without losing the panorama
You can protect privacy and still keep the long view. Place entries, garages, and service areas on the uphill or street-facing side. Use staggered elevations, low garden walls, and planted berms to block close sightlines. Reserve the largest, clearest panes for rooms that face distant vistas. Keep nearby screening low and layered so it does not intrude on the horizon.
Glass that performs in Aspen’s climate
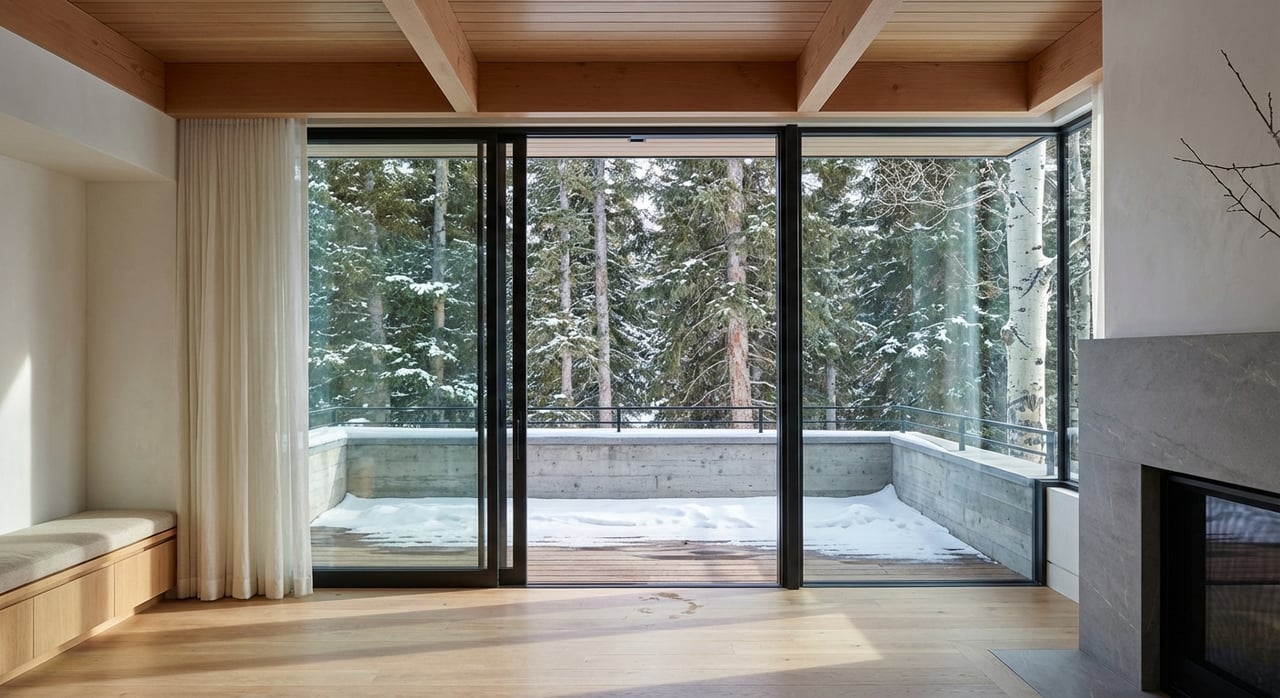
Great views mean large panes. Comfort in winter depends on using the right assemblies. In a high‑altitude, heating‑dominated climate like Aspen, your targets are low U‑factors and orientation‑specific solar control. Research on high‑performance windows recommends triple glazing with low‑E coatings and inert gas fills. Look for whole‑unit U‑factors roughly in the 0.20 to 0.28 range for expansive view walls. Select moderate to higher solar heat gain on south exposures to harvest winter sun, and lower gains with shading on west exposures to reduce afternoon overheating (high‑performance window guidance).
- Verify the NFRC label. Compare U‑factor, SHGC, visible transmittance, and air leakage at the whole‑unit level.
- Design by facade. South can work harder for you in winter. West needs help in summer.
- Specify quality frames. Thermally broken aluminum or aluminum‑clad wood often deliver slim sightlines without sacrificing performance.
Frames, corners, and minimal sightlines
Many Red Mountain homes use narrow profiles and clean corners so the glass reads as one continuous plane. Structural glass or glass‑to‑glass corners are possible with the right system and structural support. These assemblies require careful detailing for thermal breaks and water management, plus realistic expectations for maintenance and warranties. Work with specialist manufacturers early if you want that “disappearing corner” effect (corner and sliding references).
Operable walls and indoor–outdoor flow
On the terrace level, lift‑and‑slide or pocketing systems can open long spans when the weather is kind. In winter, high‑performance insulated panels keep rooms comfortable while preserving the view. La Muna’s use of large operable panes shows how to blur inside and out while maintaining cold‑weather performance (La Muna project page).
Terraces that work year‑round
Structure and snow loads
Aspen’s adopted building and energy codes list high local snow loads, which drive the design of cantilevers, decks, and guardrails. Early coordination with your structural engineer is essential so view‑facing balconies and overhangs feel light but perform safely in heavy winters (City of Aspen code and design criteria).
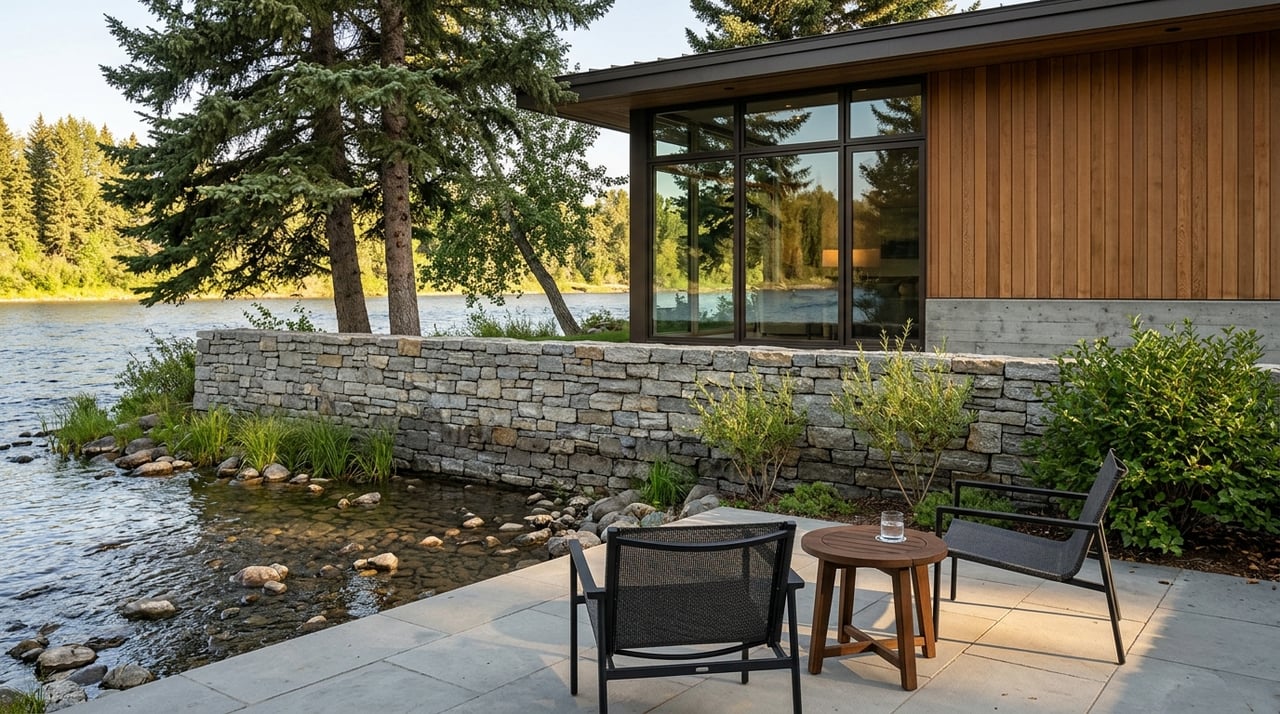
Materials that endure freeze–thaw
Choose terrace materials that handle mountain freeze–thaw cycles. Dense natural stone, thermally stable decking, and quality composites are common. Surfaces should be slip resistant, set on assemblies rated for freeze–thaw, and detailed with expansion joints and positive drainage. Local construction portfolios show stone, steel, and durable hardwoods used to good effect in Red Mountain conditions (regional project examples).
Snow management that matches your lifestyle
You will need a plan to keep key paths and terraces clear:
- Electric snow‑melt. Electric mats or cables under paving are simpler to install and suit smaller or focused areas.
- Hydronic snow‑melt. PEX in slabs ties to a boiler and scales better for larger areas.
Smart controls with temperature and moisture sensors can limit run time and energy use. Talk early with your team about which areas warrant heat and which can be cleared by hand or reserved for snow storage (snow‑melt system overview).
Drainage and flush thresholds
If you want an indoor–outdoor floor that feels seamless, the detailing matters. Flush thresholds need robust drainage and thermal separation to prevent interior water intrusion and ice build‑up. On sloped sites, plan for surface and roof runoff that moves away from the house and sensitive slopes. Many projects include formal grading and drainage plans during permitting.
Landscape, privacy, wildfire, and lighting
Vegetative screening that keeps the long view
Planting can deliver privacy without stealing the panorama. Use evergreen masses for winter screening and layer beds to break near sightlines while keeping distant views clear. Colorado State Extension guidance explains how to size planting beds for effective screens and how to pair living screens with low walls or planters for year‑round results (visual screen tips). Avoid highly flammable species close to the house.
Wildfire‑resilient siting
Red Mountain sits in the wildland–urban interface. Treat your property in zones. Keep the immediate 0 to 5 feet non‑combustible. From 5 to 30 feet, reduce fuels and separate plantings. From 30 to 100 feet, thin and manage trees to limit ladder fuels. Clean gutters, specify ember‑resistant vents, and plan annual maintenance. Your design and landscape choices should support a defensible space approach from the start (Colorado State Forest Service guidance).
Night‑sky friendly lighting
After dark, lighting should preserve star visibility and be kind to neighbors. Favor fully shielded fixtures, warm color temperature LEDs, dimmers and timers. Keep light aimed where needed and off the view corridor. Following dark‑sky principles improves comfort and keeps the mountainscape visible at night.
Permitting and timing on Red Mountain
Aspen and Pitkin County have active review environments. The city has limited the number of annual demolition permits, and larger changes often require discretionary reviews, energy compliance, and solid‑waste planning during construction. Early conversations with planning staff and an experienced local architect help you set realistic timelines and scope. If you are weighing remodel versus rebuild, study the parcel’s approvals first and do not assume city rules apply to every lot on Red Mountain. Some parcels are under county jurisdiction or may carry vested approvals that change what is possible (coverage of Aspen demo‑permit limits).
Quick project checklist
- Confirm jurisdiction and any vested approvals. Determine whether your parcel is in the City of Aspen or unincorporated Pitkin County. Do not assume the same rules apply to every lot.
- Commission early studies. Order a site survey, topographic map, geotechnical report for slope stability, tree inventory, grading and drainage plan, and a defensible‑space plan.
- Set glazing targets. For big view walls, ask for triple‑pane low‑E assemblies with whole‑unit U‑factors around 0.20 to 0.28. Select SHGC by orientation and verify NFRC labels and air leakage.
- Choose frames and corner details. Use thermally broken aluminum or aluminum‑clad wood to keep sightlines slim. Plan for structural glass corners only with proper thermal breaks and waterproofing.
- Define terrace strategy. Pick priority terraces and pathways for snow‑melt heat versus areas you will clear manually. Get cost and operating estimates for electric and hydronic systems early (snow‑melt options).
- Coordinate structure for snow loads. Involve your structural engineer early for decks, overhangs, and long spans. Aspen’s local criteria drive sizing for safety and durability (city code and design criteria).
- Plan landscape and lighting together. Layer evergreen screening for privacy, keep plantings low in view corridors, and follow dark‑sky practices with shielded, warm fixtures.
- Build your team. Select an architect, general contractor, and structural engineer with local experience. Add landscape and wildfire specialists so privacy, defensible space, and drainage are resolved in one plan.
Bringing it all together
Designing for the view on Red Mountain is a balance. You want the glass to disappear, the terraces to welcome you year‑round, and the rooms to feel warm, quiet, and private. With the right siting, high‑performance glazing, and a plan for snow, drainage, and landscape, you can capture the valley in comfort and style. If you are exploring a remodel or a new build and want a seasoned perspective on value, timelines, and the right local team, connect with Tara Cathcart & Susan Lodge to Schedule a Confidential Consultation.
FAQs
Can you have floor‑to‑ceiling glass and still stay warm in winter in Aspen?
- Yes. Use triple‑pane low‑E glazing with low U‑factors, thermally efficient frames, and orientation‑specific solar control so large view walls feel comfortable.
What is the best way to get privacy without blocking views on Red Mountain?
- Layer privacy close to the house with low walls, berms, and evergreen clusters, then keep the tallest, clearest glazing aimed at distant vistas so the horizon stays open.
Do I need to heat outdoor terraces to use them in shoulder seasons?
- Not always. Many owners heat only key paths and a primary terrace, then add wind screens, fireplaces, and thoughtful orientation to extend usability while managing energy.
How do local snow loads affect my deck and overhang design?
- Aspen’s design criteria call for high snow loads, so your structural engineer will size cantilevers, decks, and guardrails accordingly to keep spans elegant but safe.
Will I need special permits to remodel or rebuild a view‑oriented home?
- Likely. The city limits demolition permits and larger changes often go through discretionary review, so start with a parcel study and schedule early meetings with planning staff.